"Get Data - Reverse ETL" node
By means of the Get Data - Reverse ETL node, you can pull data from Google BigQuery to Synerise in any form.
This node lets you connect to a dataset in a BigQuery project through Google Service Account (using a private key). You can easily test this connection and get a preview of the retrieved data through an SQL query, with a preview limit set to 10 records.
You can download the previewed data in JSON or CSV format, which can serve as a data sample for creating data transformation rules. These rules can be applied within a workflow to modify the data imported from BigQuery, ensuring it meets Synerise’s requirements. Thus, you gain flexibility in customizing the data format while importing from BigQuery.
The SQL query allows usage of non-profile Jinjava inserts, which means you cannot use any Jinjava inserts that access the properties of the profile that is the context of the automation ({% customer <attribute> %} and `{{ customer.
The integration also lets you retrieve incremental data, eliminating the need to pull all the data each time. This way, you can import only the data that has been added since the last import. This is possible through the Jinjava tag: {{lastRunDate}}
Prerequisites
- If you use a firewall or an allowlist, make sure to allow the IP addresses listed below:
Click here to expand IPs for Azure
52.146.154.208/29(whole range in use:52.146.154.208-52.146.154.215)20.67.16.0/28(whole range in use:20.67.16.0-20.67.16.15)
Click here to expand IPs for Google Cloud Platform (GEB)35.205.120.12135.233.100.13134.77.196.14234.140.213.162104.155.38.10634.79.223.23234.77.87.1334.78.208.88
- You must have a Google BigQuery project created.
- Make sure that billing is enabled for your project. Learn how to check if billing is enabled on a project.
- Check the quota policy for streaming data.
- You must create a dataset and a table in a BigQuery project.
- You must define the schema of the BigQuery table (column definitions).
- Grant the following permission to Google Service Account: BigQuery Data Viewer (
roles/bigquery.dataViewer) on the dataset level. That makes it possible for the service account to query only the dataset you granted the permission on. It is also possible to grantroles/bigquery.dataVieweron table level, what will restrict access to only a specific table.
Best practices
- Create a new database user.
You should have a database user with the minimum required permissions specifically for Synerise import/synchronization operations. This user only requires read permissions with access limited to the tables you want to synchronize from. - Avoid using your main database for this purpose.
It’s better to create a separate database that is read-only and set up replication. This helps reducing the workload on your main database and minimizes the risk of data loss. - Synchronize only the data that you’ll use in Synerise.
This improves performance and reduces the chance of exposing sensitive information. Select only the columns that are important to you and use the{{lastRunDate}}Jinjava tag to limit synchronization to data that has changed since the last synchronization. - Set a reasonable synchronization size of data and interval to avoid overwhelming your database.
Monitor the initial synchronizations to make sure they don’t affect the security and performance of your system. You can send maximum 20,000,000 rows per journey and the data will be processed 1,000,000 per 2 minutes - Keep in mind regional data regulations.
If your database is in the US, but your Synerise workspace is based in Europe, you need to comply with GDPR and other data regulations. Before connecting your database to Synerise, ensure you are following the rules for your region.
Node configuration
- Go to Automation > Workflows > Create new.
- Start the workflow with a trigger node that doesn’t contain a customer’s context (for example, Scheduled Run).
- On the trigger node, click THEN.
- From the dropdown list, click Google BigQuery > Get Data - Reverse ETL.
- To allow the data exchange, establish a connection between Synerise and Google BigQuery, click Select connection.
- From the dropdown list, select the connection.
- If no connections are available or you want to create a new one, see Create a connection.
- If you selected an existing connection, proceed to defining the integration settings.
Create a connection
If you haven’t established any connection yet or you want to create another, establish a connection between Synerise and Google BigQuery that facilitates the exchange of data.
- In the Connection name field, enter the name of the connection.
It’s used to find the connection on the list. - Upload a JSON file with private key. You can find this file in the Big Query service.
You can download this file from Google Cloud Console > IAM & Admin > Service Accounts > Service Account Actions > Manage Keys.
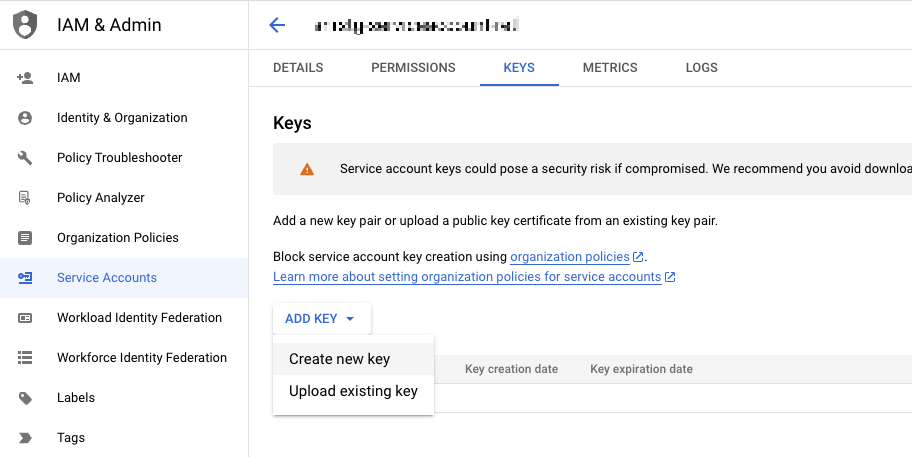
Retrieving private key from Google Service Account - Click Apply.
Result: A connection is created and selected.
Define the integration settings
In this step, define the dataset and scope of data to be fetched to Synerise.
- In the Dataset name field, enter the unique identifier of the dataset in the BigQuery project.
- In the Query field, enter the SQL formula that retrieves specific data from the dataset in Big Query.
You can optimize your query in the following way:- Find out whether you are charged for query or data amount pulled within a query.
- Querying large data sets may result in timeouts.
- Retrieve up to 20,000,000 rows in one request.
- Limit requests to 1 request in 3 hours.
- As the column names, instead of using
*, use thecolNamealiases. - Retrieve incremental data using the
{{ lastRunDate }}tag:-
Your resource in Big Query must contain a column with the date of the latest update (recommended time format:
BigQuery Timestamp type) -
Add the
{{ lastRunDate }}tag to your query, for example:
SELECT * FROM myTableName WHERE columnWithModificationDate > {{lastRunDate}} -
The value of the
{{ lastRunDate }}is saved by Synerise with each successful data pull from BigQuery within a specific workflow
-
- To test the connection and preview data that will be retrieved, click Preview data.
The preview includes up to 10 records.- To download a file with preview data, click Download Sample Data.
- Select the format file:
- .json file (recommended)
- .csv file
- If you want to use this sample to configure Data Transformation to modify the data according to Synerise requirements, click Open Data Transformation.
This feature lets you create data transformation rules according to which the data will be modified, for example, you can make operations on the column names (to comply with the Synerise import requirements), on the values inside the columns, and so on. Later on, you can add the Data Transformation node to the workflow, after the Get Data - Reverse ETL node, and in the configuration of the node select the data transformation rule to modify the incoming data.
- Confirm by clicking Apply.
We recommend monitoring the workflows that use the Get Data - Reverse ETL node. You can do it by:- previewing the statistics of the node directly in the settings of the active workflow.
- previewing the Transformation logs tab in the workflow view.
Example of use
This example shows how to send your customers’ opinions about your company stored in Google Big Query by means of a periodic import.
An example of the data used in the example:
| description | rate | |
|---|---|---|
| This product is life-changing. Finally, I have comfortable shoes. | 5 | john.doe@example.com |
| I’m satisfied with my purchase. | 5 | joan.smith@example.com |
These opinions will be imported to Synerise as a custom opinion.import event and will be available on the profiles of customers. This event will contain the following information:
- the descriptive part of the opinion, contained in the
descriptionparameter. - the rating, which will take values from 1 to 5 (1 being the lowest), contained in the
rateparameter.
Additionally, this example contains a process of creating a transformation rule based on the preview data received from the Get Data - Retrieve ETL node. This way, we will prepare the incoming data to comply with the Synerise requirements to be imported as events.

- Start your workflow with the Scheduled Run node. In the configuration of the node:
- Change the Run trigger option to all time. Define the frequency of triggering this node (for example, once a day).
- Select Immediately.
- Confirm by clicking Apply.
- As the next node, add the Get Data - Retrieve ETL node.
-
Configure the node as described in the Node configuration section.
-
In the Query field, enter a query that retrieves email, opinion, and rating. The snippets below contain queries that:
- create a table
- retrieve all data from the table (which is treated as the first import; then the import date is rendered to
1970-01-01T00:00) - retrieve the incremental data since the date of the latest import.
CREATE TABLE events (
  event_id STRING,
  email STRING,
  opinion STRING,
  rate TINYINT,
  updated_at TIMESTAMP
);
-
Preview the data and download it as a JSON file.
-
Click Open Data Transformation.
-
Transform the file as follows:
-
Add the following columns and values:
Column name Column value actionopinion.importlabelImport of opinions from Big Querytypecustom -
Rename the column name with the customer email to:
client.email -
Optionally, you can change the names of columns which contain the descriptive opinion and rating.
-
-
Save the transformation rule.
-
- Add the Data Transformation node. In the configuration of the node, select the transformation rule you created in the previous step.
- Add the Import events node. This node doesn’t require configuration.
- Add the End node.
- Click Save & Run.
Result: When the workflow is launched, theopinion.importevent will be generated on the activity list of the customers who left an opinion on your company. You can later prepare analyses based on this event and its parameters and implement marketing strategy towards these customers.